How to Apply Acrylic Nails at Home – Step-by-Step Video Tutorial Guide
Just a few days ago, nail polishing was the only method by which women decorated or painted their nails. But nowadays, the usage of acrylic nails has risen by a huge amount. Acrylic Nails, Artificial Nails or Fashion Nails whatever you say, they are always used for enhancing the beauty of your nails. It is no alternative moreover an extension that is applied to the top of natural nails of your hand. This choice of apply acrylic nails is perfect for them who want a long-lasting, solid and look of long of nails where they have a type of nails which break easily and the growth of the nails are very low or complexity in growing the nails.
Acrylic nails help to cover bad looking and unexpectedly short nails. They also help to wrap damaged, broken and weak nails that break easily. Literally, acrylic nails are appropriate for them who want their nails to give a long looking shape. It usually provides the natural nails an extra gorgeous looking as well as an extra protection. It also decorates the hands and the fingers appear longer which makes them look stunning.
You can collect your acrylic nail supplies from any beauty supply store or drugstore. Using acrylic nails enhances your overall appearance especially with your hand beauty and this process will be fulfilled with a small touch with nail polish shade, a few hand accessories and a little hand art.
Most beauty caring women used to go to a salon and apply acrylic nails. But this approach is not only time killing but also costly. By applying acrylic nails on your nails in your home you can save your money and time, at the same time you can get a creative touch and test your nails with different designs. Enough for the introduction let’s dig in how to apply acrylic nails at home.
Things you will need:
Before starting applying the acrylic nails you will need the following tools:
- Nail file
- Nail cutter or clipper
- Acrylic nails
- Acrylic nail glue
- Primer pen (optional)
- Nail forms
- Monomer liquid
- Acrylic nail powder
- Small glass bowl
- Brush
- Toothpick
- Top coat
- Nail polish (optional)
We can divide all the steps into three major applying process:
1. APPLYING THE NAILS Step-by-Step Tutorial Guide
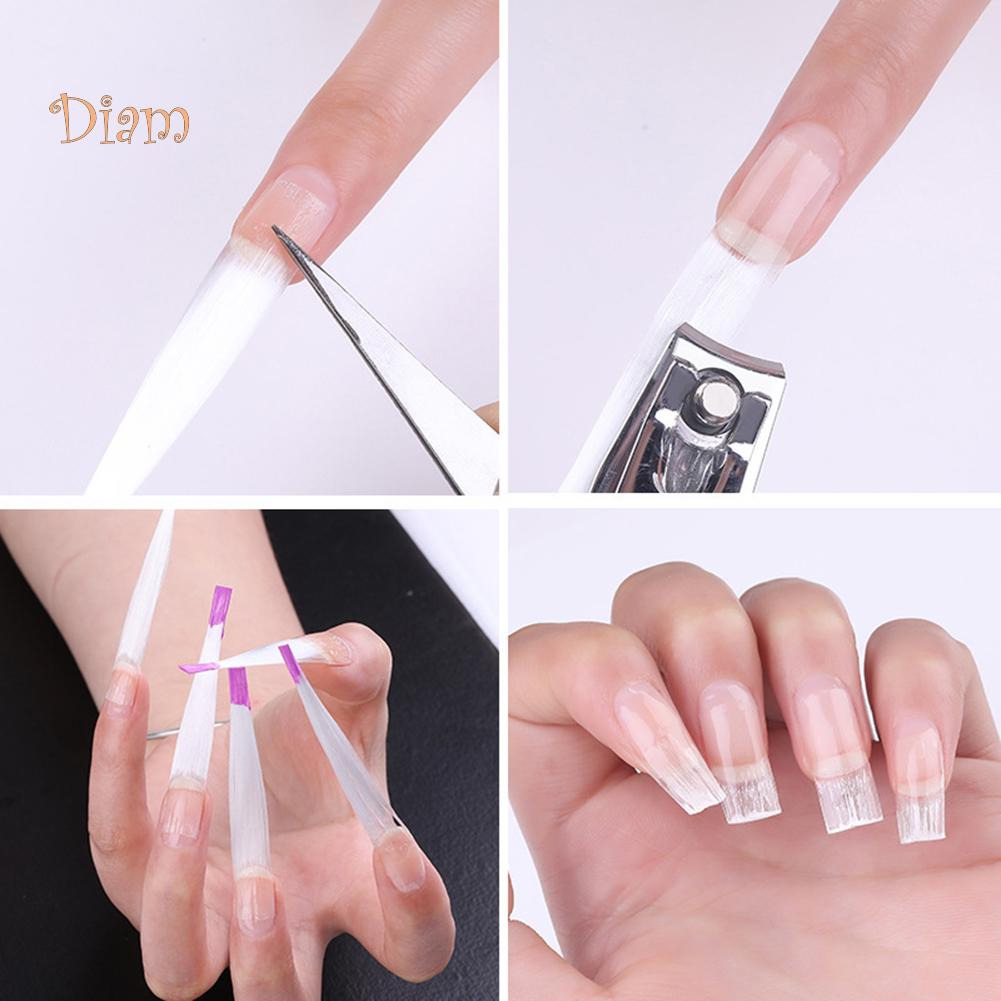
There are several steps involved in applying the nails.
Now you see the differences between the filed acrylic nails and the nails waiting for filing. The filed nails will merge with the natural nails and you will no longer find the artificial appearance. Apply and repeat the process for all acrylic nails.
2. APPLYING THE ACRYLIC [ 2nd Method ]
There are several steps involved in applying the acrylic
Step 1: Prime:
We recommend to use a primer as it strengthens the acrylic nails as well as the join between the natural nails and the acrylic nails. A strong bond keeps them durable and firm.

Wash your hand and sanitize your nails with an antibacterial hand sanitizer before acrylic nail application process to prevent infection.
Step 2: Select the nail forms:
From the tray, choose the nails forms that will fit with your natural nails.
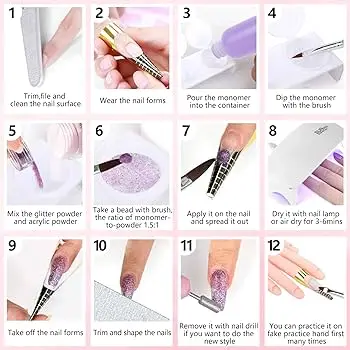
Step 3: Make the acrylic mixture:
Take some monomer liquid in a small glass bowl. Change the solution when you swap hand.
Step 4: Dip and swipe:
Take a suitable and thin brush and dip into the monomer liquid. Wipe away any excess liquid into a paper towel. Then, one more dip into the brush in the powder and quickly swipe the brush in a single stroke through it.
Step 5: Apply the acrylic mixture on the nail forms
Apply the brush with the mixture on the base of a nail form and apply the form onto your nails immediately. Do the same process for all 10 process. It will take 1 to 2 minutes to dry each form.
Step 6: Remove the excess liquid
Remove the excess liquid dripping from the sides with a toothpick or any clean suitable thick tool.
Step 7: Remove the forms
Carefully and gently twist the forms to remove them after the acrylic mixture has dried.
Step 8: Filing
Now file the unsmooth edges at the tip of your nails.
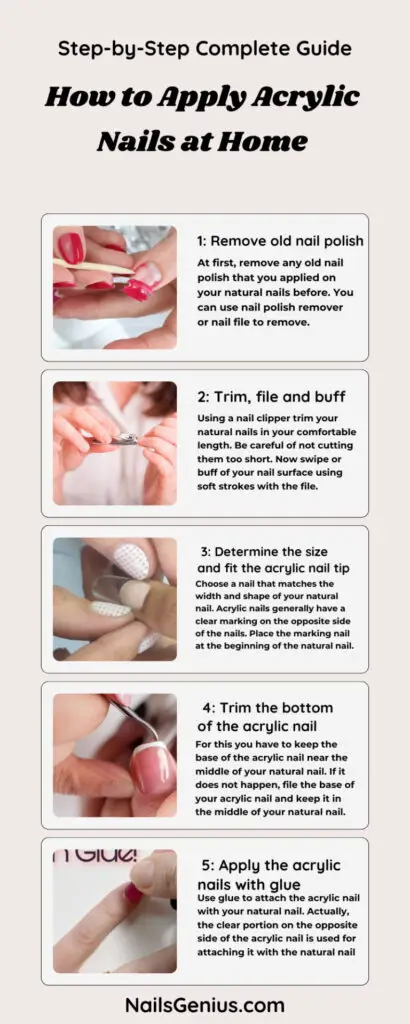
How to Apply Acrylic Nails at Home – Step-by-Step infographics Tutorial Guide
3. APPLYING THE TOP COAT:
To give the nails a smooth and glossy finished look apply the top coat into it. You can use a specialized acrylic gel top coat for this.
When the top coat will dry, you can apply some nail polish to enhance the extra looking of your nails. Don’t use any acetone nail polish that can cause a negative effect on the longevity and strength of your acrylic nails
Additional Tips:
- Wash your hand and sanitize your nails with an antibacterial hand sanitizer before acrylic nail application process to prevent infection.
- You can apply some cuticle oil to the base of the natural nails to moisturize then after applying the top coat in the final step of the process.
- Be careful and cautious with your extra-sized nails as they can get caught in clothing and also other places and break off.
You can also visit for Google more details and information.
How to apply acrylic nails step by step?
How can I do my own acrylic nails at home?
How do you apply fake nails step by step?
Can you put acrylic over your own nails?
FAQ’s
How to apply acrylic nails step by step?
Applying acrylic nails requires specific products and practice. While possible at home, consider seeking professional help for best results and nail health.
How can I do my own acrylic nails at home?
1. Clean and shape your nails.
2. Apply a primer and a base coat.
3. Dip the brush into the acrylic powder and apply it to your nails.
4. File and buff your nails, and apply a top coat to seal in color
Can You Put Acrylic Over Your Own Nails?:
Yes, you can apply acrylic over your own nails. Prep your nails by cleaning, shaping, and buffing them.
Apply the acrylic using a brush and liquid monomer.
File and shape the nails as desired
How do you apply fake nails step by step?
Remove old nail polish.
Soak your nails in warm water.
Trim and file your nails.
Push back your cuticles.
Apply the nail tips with glue and shape them.
File and blend the tips with the natural nail.
Decorate the nails with nail polish or other designs